芯片板运行介绍
eMMC启动
这块板子有2种启动方式,一种是从eMMC启动,一种是从CCT模式(仿真器)模式启动
这里先介绍eMMC启动
开发板环境配置
将开发板的拨码调至emmc模式,如图

然后给开发板上电,开发板就能自然地运行Linux,输入root登录开发板
... ...
[   13.931144] Segment Routing with IPv6
[   13.937142] sit: IPv6, IPv4 and MPLS over IPv4 tunneling driver
[   13.955652] NET: Registered protocol family 17
[   13.964813] 9pnet: Installing 9P2000 support
[   13.970620] Key type dns_resolver registered
[   13.996851] ttyS0 - failed to request DMA
[   14.004741] Freeing unused kernel memory: 220K
[   14.009632] This architecture does not have kernel memory protection.
[   14.016480] Run /init as init process
Starting syslogd: OK
Starting klogd: OK
Starting mdev... OK
Initializing random number generator... [   32.417517] random: dd: uninitialized urandom read (512 bytes read)
done.
Starting network: OK
processor       : 0
hart            : 0
isa             : rv64imafdcvu
mmu             : sv39

Welcome to Buildroot
buildroot login: Skip the ci test

Welcome to Buildroot
buildroot login: root
#
就可以对开发板进行网络配置或者进行nfs网络配置了
举例如下:
ifconfig eth0 up;
ifconfig eth0 172.16.150.217 netmask 255.255.255.0;
route add default gw 172.16.150.254;
mount -t nfs -o nolock 172.16.150.211:/home/xxx /mnt;
CCT模式启动
参考 readme.txt -> Run with hardware,硬件运行的 Linux 二进制程序镜像与QEMU相同,但是需要配合 hw 目录下的硬件初始化脚本。无论何种芯片板,都可以通过 Jtag 接管 CPU,从而运行 Linux
- 运行 JtagServer,成功连接开发板
- 通过 hw 目录下的 run.sh 连接 JtagServer ,下载并运行 linux
连接 JtagServer 硬件盒子
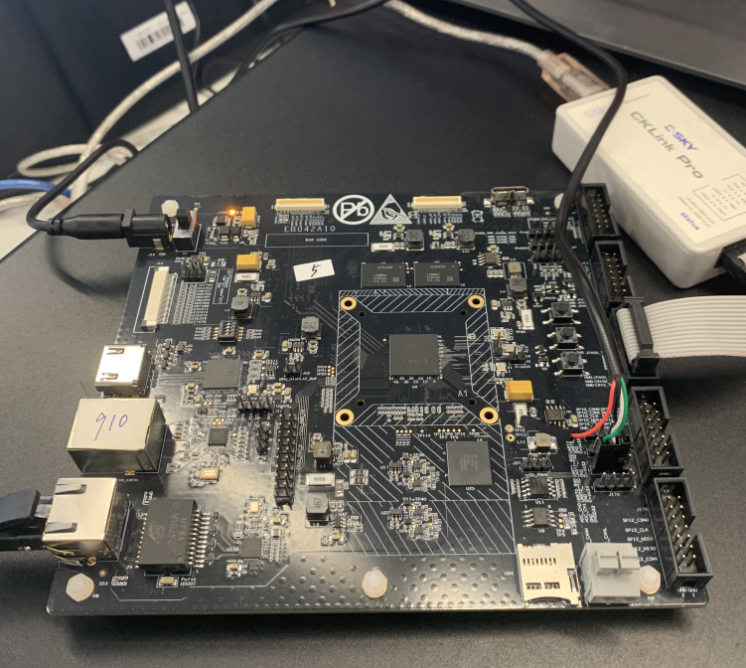
上图是 ICE_EVB 开发板,图右侧 CKLink Pro 就是 Jtag Server 的硬件盒子,连接到板子的 5 线 Jtag 排针上,直接接到 CPU JTAG HAD 电路。靠近 JTAG 排针的红绿白黑线,就是 usb 串口 TTL 线用于串口输出 一般设置为 115200/8/N/1
运行 JtagServer
Jtag Server 的 Host 端程序包含在 toolchain_thead_xxx.tar.xz 中,一般解压到 host 目录下,进入 ./host/csky-jtag/C-Sky_DebugServer 目录,执行 ./DebugServerConsole.elf -setclk 6 (最后一个参数 -setclk 是设置 JTAG TCK 频率,如果连接不稳定可以降低该频率,6 即时 6Mhz)成功后会出现探测到的 CPU 信息:
#./DebugServerConsole.elf -setclk 6
+---                                                    ---+
|  C-Sky Debugger Server (Build: Apr 29 2020)              |
   User   Layer Version : 5.10.04
   Target Layer version : 2.0
|  Copyright (C) 2020 Hangzhou C-SKY Microsystems co.,ltd  |
+---                                                    ---+
C-SKY: CKLink_Pro_V2, App_ver 0.0, Bit_ver 1.12, Clock 6000.000KHz,
       5-wire, With DDC, Cache Flush On.
CPU 1 may be still in reset mode, DebugSever will not connect it(rmr is 0x00000001).
+--  CPU 0  --+
C-SKY CPU ID:
    WORD[0]: 0x049c4683
    WORD[1]: 0x16000001
    WORD[2]: 0x20800000
    WORD[3]: 0x30340076
    WORD[4]: 0x40000205
    WORD[5]: 0x50000001
Target Chip Info:
    CPU Type is CK860MFV, in LITTLE Endian.
    L1ICache size 32KByte.
    L1DCache size 64KByte.
    L2Dcache size 256Kbytes, without ECC supporting.
    Bus type is AXI128.
    Signoff date is 00/0000.
    Target is 2 cores.
    Target has no device slave IF.

GDB connect command for CPU 0:
    target remote 127.0.0.1:1025
    target remote 172.16.170.7:1025

****************  DebuggerServer Commands List **************

singlestep/si
    execute single-step in the target
reset
    reset the target
pctrace
    show the PCFIFO(8 <= length <= 4096, default 8)
print/p
    print /x[d/f/o] *memory[$registers], eg p /x *0x20000000
    print target
set
    Set *memory[$registers]=value, eg. set $r0=0x1234
quit/q
    quit Debugger Server
help/h
    show help informations
CTRL+B ENTER
    switch input channel
*************************************************************
DebuggerServer$
下载并运行 Linux
最后使用统一 run.sh 脚本进行下载
run.sh <ip地址:端口> <硬件板类型> <cpu数量>

举例 910_ice_evb 命令:
run.sh 127.0.0.1:1025 ice_evb 2
run.sh 脚本做以下事情:
- 获取 rootfs.cpio.gz 的大小,并以此设置设备树文件的 initrd-start, initrd-end 字段
- 按需要运行 ddrinit.[board].txt 初始化程序,配置时钟,DDR
- 运行 gdbinit.[board].txt 下载 rootfs.cpio.gz, hw.dtb, Image 到内存,设置 pc 到指定内存执行
此时,如果串口正常,就可以看到 Linux shell 了。
无串口调试
在没有串口的情况下,我们依然可以调试 Linux,利用 Jtag 直接获取 dmesg 信息,只需 CPU + 内存,不借助其他外设
wget -nc https://git.kernel.org/pub/scm/linux/kernel/git/torvalds/linux.git/tree/Documentation/admin-guide/kdump/gdbmacros.txt # 获取著名 kernel.org gdb 调试脚本
在 gdb 里加载 vmlinux 符号表,加载 gdbmacro.txt 脚本,运行 dmesg
file linux/vmlinux
file linux/Documentation/admin-guide/kdump/gdbmacros.txt
dmesg
gdbmacro.txt 还包含很多其他调试命令,请自行学习