U-Boot 用户手册
该文章将介绍玄铁cpu u-boot,以及u-boot-ppl,u-boot-spl等相关固件的烧写方法
u-boot的使用
进阶玩法
如果一块开发板中和cpu,ddr等关键器件相关的固件(ppl,spl)没有烧好,就需要手动来烧写它们,并且这个时候,开发板也是无法运行u-boot的,此时,得依赖gdb启动开发板,然后烧写启动相关的固件
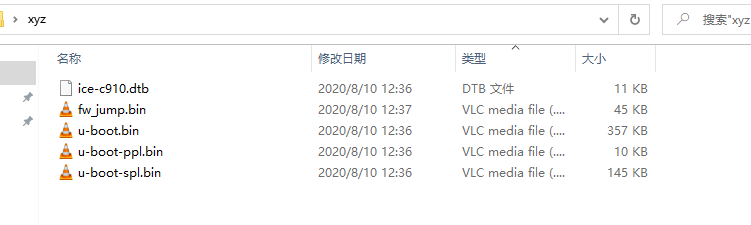
获取固件
可以通过链接下载固件,也可以通过源码编译,这里先介绍通过链接下载
这里的固件将CPU配置成1.2GHz的频率
ice-c910.dtb(比如ice开发板的dtb就叫ice-c910.dtb)
fw_jump.bin(opensbi)
通过源码编译
工具链(编译器)请在 riscv-linux-gcc 下载
以ice开发板为例(此处的~/nixon/xxxx为编译器路径,需要根据实际情况,填写对应的编译器路径)
cd ~/
git clone git@gitlab.alibaba-inc.com:thead-linux/u-boot.git
cd u-boot
make ice_evb_c910_defconfig
make ARCH=riscv CROSS_COMPILE=~/nixon/bin/riscv64-unknown-linux-gnu- -j
cd ~/
git clone git@gitlab.alibaba-inc.com:thead-linux/opensbi.git
PLATFORM=thead/c910 \
CROSS_COMPILE=~/nixon/bin/riscv64-unknown-linux-gnu- \
FW_TEXT_START=0x00000000 \
FW_JUMP_ADDR=0x00200000 \
make -j
这样,固件就全部都生成出来了
~/u-boot/ppl/u-boot-ppl.bin
~/u-boot/spl/u-boot-spl.bin
~/u-boot/arch/riscv/dts/ice-c910.dtb
~/u-boot/u-boot.bin
~/opensbi/build/platform/thead/c910/firmware/fw_jump.bin
烧写固件
通过gitlab编译出来的环境,做一定修改,再通过gdb启动开发板并运行u-boot,就可以和“快速上手”章节中一样,通过u-boot来烧写上述的固件了,具体步骤如下:
mkdir zzz
cd zzz
wget -nc https://gitlab.com/c-sky/buildroot/-/jobs/677692200/artifacts/raw/output/images/hw.tar.gz
wget -nc https://gitlab.com/c-sky/buildroot/-/jobs/677692200/artifacts/raw/output/images/rootfs.cpio.gz
tar zxvf hw.tar.gz
cd hw
cp ~/u-boot/arch/riscv/dts/ice-c910.dtb ./
cp ~/u-boot/u-boot.bin ./
根据以下diff,修改gdbinit.ice_evb.txt
 # Load rootfs
-restore ../rootfs.cpio.gz binary $rootfs_addr

 # Load dtb
-restore hw.dtb binary $dtb_addr
+restore ice-c910.dtb binary $dtb_addr
 set $a1 = $dtb_addr

 # Load kernel
-restore ../Image binary $vmlinux_addr
+restore u-boot.bin binary $vmlinux_addr

 # Load opensbi
 restore fw_jump_0G.bin binary $opensbi_addr
然后将开发板调至cct模式,如图:
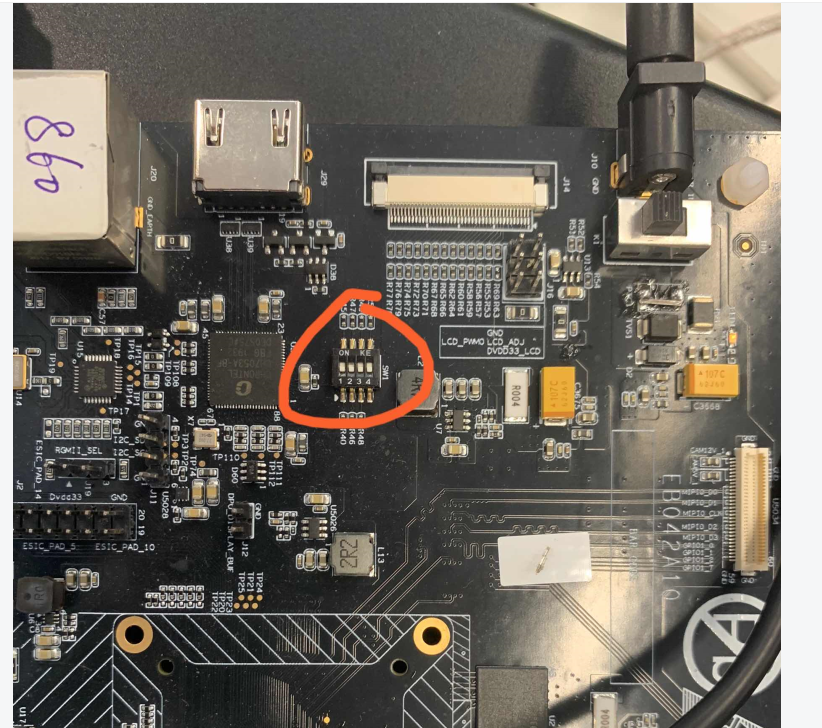
并上电启动,开发板会进入等待gdb连接的状态
打开DebugServer
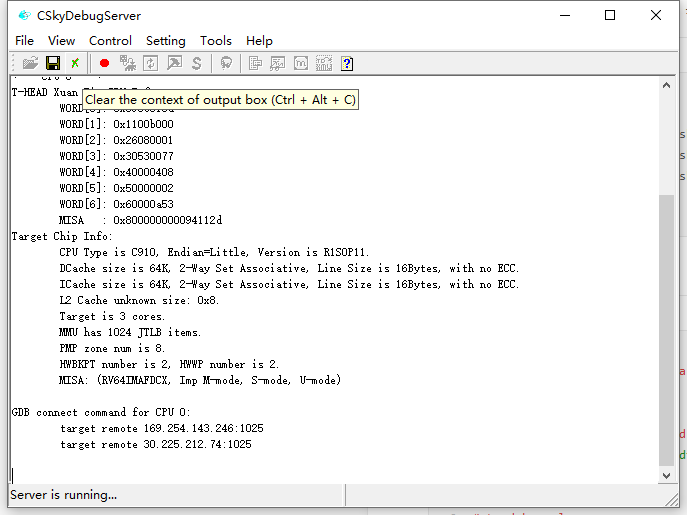
此时在终端中(处于hw目录内),输入以下命令(ip需要根据实际场景配置):
./run.sh 30.225.212.74:1025 ice_evb 1
就可以看到u-boot启动了
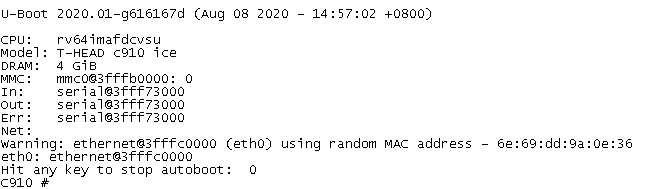
接下来,如“快速上手”章节中所述,连上网线,配好网络,打开tftp并准备好待烧写固件的文件夹
在u-boot中,通过以下命令进行烧写:
mmc dev 0 1

tftp ${avail_addr} u-boot-ppl.bin
mmc write ${avail_addr} ${ppl_start_sector} ${ppl_size_sector}

tftp ${avail_addr} u-boot-spl.bin
mmc write ${avail_addr} ${spl_start_sector} ${spl_size_sector}

tftp ${avail_addr} ice-c910.dtb
mmc write ${avail_addr} ${fdt_start_sector} ${fdt_size_sector}

tftp ${avail_addr} fw_jump.bin
mmc write ${avail_addr} ${opensbi_start_sector} ${opensbi_size_sector}

tftp ${avail_addr} u-boot.bin
mmc write ${avail_addr} ${uboot_start_sector} ${uboot_size_sector}
mmc dev 0 1命令表示此时操作的是emmc的boot分区,而非“快速上手”章节中的user分区 最后,将开发板调回emmc模式,并复位,开发板就能自动运行至u-boot阶段了
文件系统分区挂载
当Linux系统启动后,如果需要对emmc进行一些文件系统级别的使用的话,可将其格式化为一个ext2文件系统
操作如下:
# ls /dev/mmcblk*
/dev/mmcblk0       /dev/mmcblk0boot0  /dev/mmcblk0boot1  /dev/mmcblk0p1
如果其中有/dev/mmclkb0p1节点,表示该开发板已经有了一个可挂载的ext2分区,可直接mount
mkdir xyz
mount /dev/mmcblk0p1 xyz
# df -Th
Filesystem           Type            Size      Used Available Use% Mounted on
devtmpfs             devtmpfs      965.6M         0    965.6M   0% /dev
tmpfs                tmpfs         970.5M         0    970.5M   0% /dev/shm
tmpfs                tmpfs         970.5M     24.0K    970.5M   0% /tmp
tmpfs                tmpfs         970.5M     24.0K    970.5M   0% /run
/dev/mmcblk0p1       ext2            3.5G     20.0K      3.3G   0% /root/xyz
可以看到,这样就生成了一个ext2格式的磁盘
如果没有/dev/mmcblk0p1节点
# ls /dev/mmcblk*
/dev/mmcblk0       /dev/mmcblk0boot0  /dev/mmcblk0boot1
则需要为ext2文件系统手动格式化一个分区
# fdisk /dev/mmcblk0
显示:
The number of cylinders for this disk is set to 120832.
There is nothing wrong with that, but this is larger than 1024,
and could in certain setups cause problems with:
1) software that runs at boot time (e.g., old versions of LILO)
2) booting and partitioning software from other OSs
   (e.g., DOS FDISK, OS/2 FDISK)

Command (m for help): m
Command Action
a       toggle a bootable flag
b       edit bsd disklabel
c       toggle the dos compatibility flag
d       delete a partition
l       list known partition types
n       add a new partition
o       create a new empty DOS partition table
p       print the partition table
q       quit without saving changes
s       create a new empty Sun disklabel
t       change a partition's system id
u       change display/entry units
v       verify the partition table
w       write table to disk and exit
x       extra functionality (experts only)
输入p查看已有的分区:
Command (m for help): p
Disk /dev/mmcblk0: 3776 MB, 3959422976 bytes, 7733248 sectors
120832 cylinders, 4 heads, 16 sectors/track
Units: sectors of 1 * 512 = 512 bytes

Device       Boot StartCHS    EndCHS        StartLBA     EndLBA    Sectors  Size Id Type
可以看到,并没有分区,现在输入n来创建:
Command (m for help): n
Partition type
   p   primary partition (1-4)
   e   extended
再输入p表示创建primary分区
p
Partition number (1-4): 1
First sector (16-7733247, default 16): 278528
Last sector or +size{,K,M,G,T} (278528-7733247, default 7733247):
Using default value 7733247
这里分区号选1,并且从sector 278528开始(以ice开发板为例,这需要根据emmc的实际规划来决定),最后的sector选择默认的7733247
再次输入p来查看分区情况:
Command (m for help): p
Disk /dev/mmcblk0: 3776 MB, 3959422976 bytes, 7733248 sectors
120832 cylinders, 4 heads, 16 sectors/track
Units: sectors of 1 * 512 = 512 bytes

Device       Boot StartCHS    EndCHS        StartLBA     EndLBA    Sectors  Size Id Type
/dev/mmcblk0p1    1023,3,16   1023,3,16       278528    7733247    7454720 3640M 83 Linux
最后,输入w来保存该分区信息至mbr
Command (m for help): w
The partition table has been altered.
Calling ioctl() to re-read partition table
至此,分区的创建就完成了;但还需要格式化该分区
mkfs.ext2 /dev/mmcblk0p1
这样,一个ext2的文件系统就完成了(ext4也一样);即使重启,该分区信息仍然存在,通过之前的mount命令,便可实现挂载