准备工作
安装Linux基础环境
以ubuntu 16.04 版本为基础。
如果用户还没有 Linux 环境,可以在 windows 下安装一个virtualbox ubuntu虚拟机,也可以安装 WSL。
获取YocTools
YocTools 要求系统安装 python2.7或者python3.6+,以下是在 ubuntu 环境下安装 yoctools 的命令:
sudo pip install --no-binary=yoctools https://yoctools.oss-cn-beijing.aliyuncs.com/yoctools-1.0.60.tar.gz -i https://mirrors.163.com/pypi/simple/
安装后在命令行中输入yoc --version,有版本号出现则表示安装成功
yoc --version
1.0.60.1
安装编译工具链
命令行中输入
yoc toolchain -c
安装后在命令行输入csky-abiv2-elf-gcc -v,有版本号出现则表示安装成功
csky-abiv2-elf-gcc -v
gcc version 6.3.0 (C-SKY Tools V3.10.18 Minilibc abiv2 B20191218)
安装C-sky DebugServer
下载并安装后,桌面出现如下图标

应用程序创建及运行
创建工作空间
通过 init 命令来初始YoC 的开发环境:
mkdir yoc_workspace
cd yoc_workspace
yoc init
执行完毕之后,如果在yoc_workspace目录生成一个隐藏的.yoc文件,说明初始化成功了。
创建helloworld示例工程
使用install命令下载helloworldsolution,命令如下
yoc install helloworld
下载 helloworld 示例工程后,工作目录结构如下:
boards/
components/
solutions/helloworld/
- 目录介绍 | 目录组 | 描述 | | :--- | :----: | | boards | 板级配置相关组件 | | components/ | 通用组件 | | solutions/ | 方案组件 |
工程编译
在对应solution组件里执行make命令,实现solution的编译:
cd solutions/helloworld
make
注:make默认使用board的组件为pangu_cpu0
- 更换board组件
使用list 命令查询当前solution支持的board组件,如下所示helloworld共支持4款board,board_dummy、cb2201、cb5654、pangu_cpu0
yoc list -b
* board_dummy (V7.3.0)                    - csi_dummy development board configure.
* cb2201 (V7.3.0)                         - CB2201 board configure.
* cb5654 (V7.3.0)                         - 智能语音开发板CB5654板级适配组件
* pangu_cpu0 (V7.3.0)                     - YunVoice CPU0 board configure.
以cb2201为例,更换board组件,在make中增加BOARD参数
make BOARD=cb2201
下载及运行
- 硬件连接
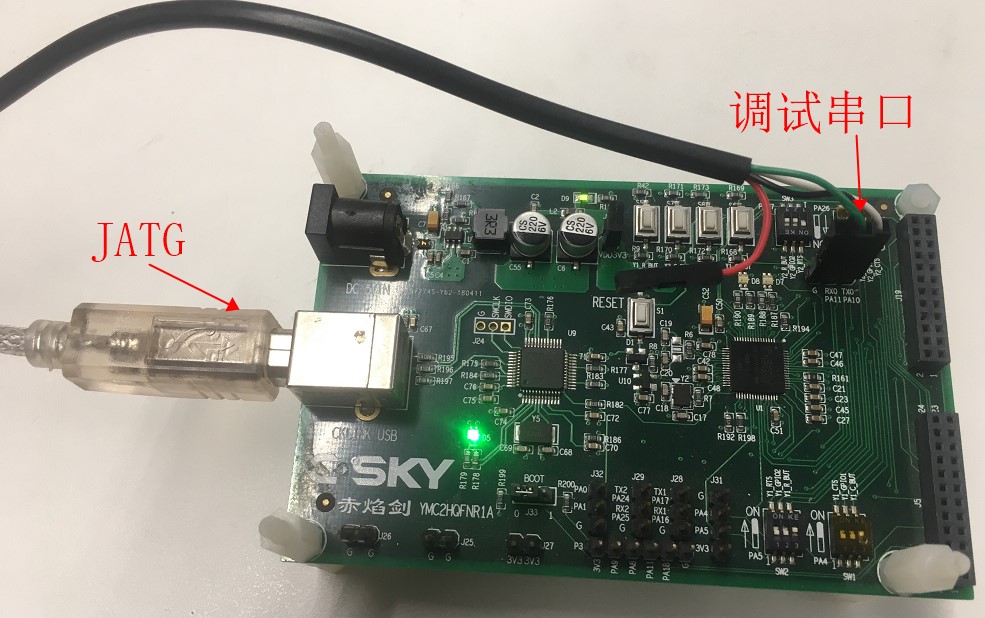
以cb2201开发板为例,需连接JTAG及调试串口,如下图所示

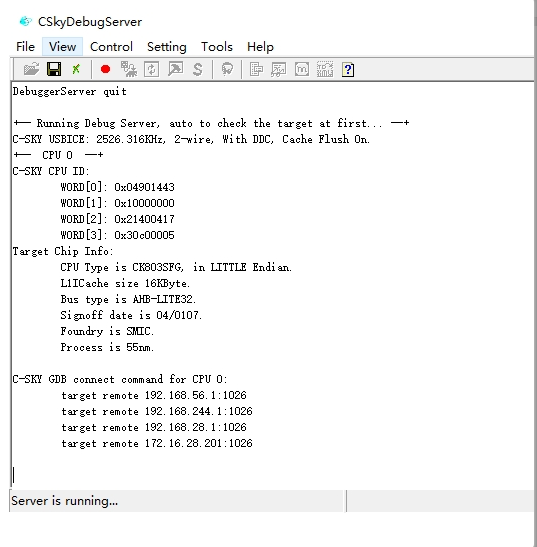
连接好硬件后,连接CSkyDebugServer,连接成功如下图所示

- 烧写
使用make flashall烧写
make flashall
Program partition: imtb         address: 0x10000000, size 4096 byte
erasing...
program 110001000, 100%
Program partition: tee          address: 0x10001000, size 20200 byte
erasing...
program 10005000, 100%
Program partition: boot         address: 0x10006000, size 22684 byte
erasing...
program 1000b000, 100%
Program partition: prim         address: 0x1000c000, size 38172 byte
erasing...
program 10015000, 100%
注:首次烧写会提醒Input gdb DebugServer IP:PORT :,将CSkyDebugServer中的ip及port输入即可
Input gdb DebugServer IP:PORT : target remote 192.168.56.1:1026
- 运行效果
烧写成功后,PC端打开串口工具,通过开发板的Reset按键复位板子
boot1.1
Tee v2.0.1 Initliaze done, Dec 19 2018 11:44:54
[     0.002071][I][INIT    ]Build:May 14 2020,00:09:19
[     0.006855][D][MTB     ]get_sys_partition----------
[     0.011851][E][MTB     ]flash open e
[     0.015486][E][MTB     ]cant find mtb
[     0.019300][E][INIT    ]partition init failed
Welcome to CLI...
> [     0.026198][D][app     ]

[     0.029107][D][app     ]Hello world! YoC
[     1.033104][D][app     ]Hello world! YoC
[     2.037041][D][app     ]Hello world! YoC
cli命令使用
在串口工具输入相关命令
- help
显示当前YoC系统所有支持的命令行命令
help
help            : show commands
ps              : show tasks
free            : show memory info
- ps
查看当前系统的进程状态
ps

CPU USAGE: 1/10000
task                 pri status      sp     stack size max used ratio left tick
-------------------- --- ------- ---------- ---------- -------- ----- ---------
dyn_mem               60 pend    0x60002998        256      156   60%        0
idle_task             61 ready   0x60002dc4       1024       88    8%        0
DEFAULT-WORKQUEUE      9 pend    0x60002190       2048      144    7%        0
timer_task             5 pend    0x60002a9c        800      184   23%        0
cpu_stats             60 sleep   0x60001fc0        200      136   68%      500
app_task              32 sleep   0x60004a3c       8192      540    6%     1000
at&cli                32 ready   0x600070ec       2048      576   28%     1000
uart_task             32 pend    0x60007a50       2048      180    8%    10000
更多cli命令请见控制台命令
代码示例
board_init
src/init/init.c
startup.S 会先调用board_init函数,在该函数中主要完成开发板引脚复用的初始化。
void board_init(void)
{
    board_pinmux_config();
}
board_yoc_init
src/init/init.c 在该函数中主要完成设备的注册、分区初始化及启动cli微服务。
void board_yoc_init()
{
    /* uart dev register*/
    uart_csky_register(CONSOLE_IDX);
    console_init(CONSOLE_IDX, 115200, 128);

    LOGI(TAG, "Build:%s,%s",__DATE__, __TIME__);
    /* load partition */
    int ret = partition_init();
    if (ret <= 0) {
        LOGE(TAG, "partition init failed");
    } else {
        LOGI(TAG, "find %d partitions", ret);
    }

    /* cli uService init */
    utask_t *task = utask_new("at&cli", 2 * 1024, QUEUE_MSG_COUNT, AOS_DEFAULT_APP_PRI);

    board_cli_init(task);
}
main
src/main.c 主要完成调用board_yoc_init及每隔1s打印一次“Hello world! YoC”
int main()
{
    board_yoc_init();
    LOGD(TAG, "%s\n", aos_get_app_version());

    while (1) {
        LOGD(TAG, "Hello world! YoC");
        aos_msleep(1000);
    }

    return 0;
}